Sunday, June 23, 2013

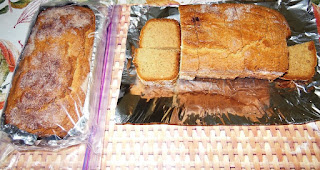
Vanilla Amish Friendship Bread


Loaf on left is packaged and ready to be gifted
The other loaf is for us
This is the 3rd batch of starter batter for Amish Friendship Bread (AFB) that I have taken care of, through the 10 Day Regimen.  We were going to an American folk songs of the 60’s concert by Gemini last Friday with friends who invited us to dinner before the concert so I took one of these loaves for them to freeze.  For dinner she prepared a salad and Moussaka and for dessert we had some of the bread I made from the second batch of starter batter, Carrot Amish Friendship Bread and Chocolate Amish Friendship Bread.  That dinner and the concert afterwards made for a very enjoyable evening!

You can make your own starter batter or save a whole lot of time if you get it from a friend. However, if you wish to give your friends some of your starter batter, you will have to nurse it through the 10 Day Regimen.

To make 2 loaves of this bread, you will need 1 cup of starter batter.

Ingredients:

Wet -
1 cup AFB starter batter
3 eggs, beaten
1 cup Canola oil
½ cup milk
1 cup sugar
2 tsp. cinnamon
1/2 tsp vanilla

Dry -                      
2 cups flour
1 large (5.9 oz.) pkg. instant Vanilla pudding
1½ tsp. baking powder
½ tsp. baking soda
2 tsp. cinnamon
½ tsp. salt

For Dusting -
¼ cup sugar
1 tsp. cinnamon powder

Optional -
1 cup raisins
1 cup chopped nuts

Directions:
1. Pre-heat oven to 325°F.
2. Mix Dusting ingredients together.  
3. Grease or butter 2 large loaf pans and dust with half the cinnamon/sugar mixture.
4. Beat Wet ingredients together until sugar dissolves.
5. Sift Dry ingredients and work into batter until well combined.
6. Stir in the Optional ingredients, if using.
7. Pour batter into pans and sprinkle top with remaining cinnamon/sugar mixture.
8. Bake for 50–60 minutes until toothpick inserted in center comes out clean.
9. Cool on a wire rack until bread loosens from sides of pan before slicing.

Note: This bread freezes well if packaged in a 1 gallon Ziploc bag.


10 Day Regimen for Amish Friendship Bread Starter

Add caption

This is the Amish Friendship Bread Starter batter that you will need to make Amish Friendship Bread.  Adding a cup of starter batter, after it has maturedfor ten days, to any sweet bread recipe makes it yeasty and delicious. The texture of the resulting bread is unbelievable!


At the end of 10 days you will have 5 cups of starter batter, enough for 4 friends, along with a cup of extra batter for making 2 loaves of sweet bread for yourself. If you keep a bag of starter batter for yourself (and give the other 3 away), you will be making 2 loaves of sweet bread every 10 days. What a treat! 


Here are a few pointers to keep in mind when handling the Amish Friendship Bread Starter (AFBS) batter:

1.  Make sure the Ziploc bag of starter batter is dated. This is Day 1 of 10 of the fermentation process. You may find it helpful to mark this date on your calendar as AFBS Day 1, along with AFBS Day 5 with a note to add ingredients to the bag, and AFBS Day 10 with a note to make bread.

2.  Avoid using metal utensils or containers. It is very important to use plastic or wooden utensils and plastic or glass containers when handling the starter batter.

3.  Do not refrigerate the starter batter at any time during the ten days of fermentation. Leave it at room temperature so that it can mature.

4.  It is natural for the starter batter to rise and bubble as it matures.  Work the air away from the batter towards the lip of the Ziploc bag and unzip it to remove any built-up air in the bag. Make sure to zip up the bag to prevent the batter from leaking out.
5.  When the Ziploc bag is opened to release the air, the batter should smell sweet and yeasty. If it is at all malodorous and/or the batter is at all discolored at any time during the ten days, throw the bag and its contents in the garbage.  Start the process over by making your own starter batter and don’t, under any circumstances, try to salvage the spoiled batter.

6.  Prior to Day 10, read through all the ingredients for making the bread of your choice and make sure you have all the necessary ingredients. It’s most annoying to have to go shopping on Day 10 because it’s going to be a busy day!

7.  Make sure you have enough 1 gallon Ziploc bags on hand for dividing your starter batter. Even though there isn’t a lot of batter in there on Day 1, by Day 10 the 5 cups of starter batter pretty much fills up a 1 gallon Ziploc bag.

8.  It is possible to freeze the starter batter.  When you’re ready to start the 10 Day Regimen, mark the date and day (1 or 2 or 3…) on the bag and make sure to mark the new dates for Day 1, Day 5 and Day 10 on your calendar.       

The 10 Day Regimen

Day 1:   Squash and mix the bag of starter batter.
Day 2:    Squash and mix the bag of starter batter.
Day 3:    Squash and mix the bag of starter batter.
Day 4:    Squash and mix the bag of starter batter.

Day 5:   
Add 1 cup white sugar, 1 cup all-purpose flour and 1 cup milk to the bag.
Release all the air from the bag and make sure to zip up the bag.
Squash and mix the bag of starter batter until sugar dissolves.

Day 6:    Squash and mix the bag of starter batter.
Day 7:    Squash and mix the bag of starter batter.
Day 8:    Squash and mix the bag of starter batter.
Day 9:    Squash and mix the bag of starter batter.

Day 10:
Add 1 cup white sugar, 1 cup all-purpose flour and 1 cup milk to the bag.
Squash and mix the bag of starter batter.
Pour entire contents of bag into a large glass or plastic bowl.
Measure 1 cup into each of 4 (1 gallon) Ziploc bags.
Set aside the remaining cup of batter in bowl to make 2 loaves of Amish Friendship Bread for yourself.
Keep one bag for yourself and give the other 3 to friends.
Make sure to date each bag and to include a copy of this 10 Day Regimen, along with the recipes for Vanilla Amish Friendship Bread and its variations. 


Amish Friendship Bread Starter


This is the Amish Friendship Bread Starter recipe that you will need to make Amish Friendship Bread.  It is ideal if you receive the starter batter from a friend because it will save you a lot of time – 10 days, to be exact! That is, if you are going to use it to bake your 2 loaves right away.  If you want to share your starter batter with friends, then you will have to go through the 10 Day Regimen yourself. Adding a cup of starter batter after it has matured for ten days, to any sweet bread recipe makes it yeasty and delicious. The texture of the resulting bread is unbelievable! 


After making this Starter batter, follow the instructions in the 10 Day Regimen.  At the end of 10 days you will have enough starter batter for 4 friends, along with extra batter for making 2 loaves of sweet bread for yourself. If you keep a bag of starter batter for yourself (and give the other 3 away), you will be making 2 loaves of sweet bread every 10 days. What a treat!


Here are a few pointers to keep in mind when handling the starter batter:

1. Avoid using metal utensils and containers. It is very important to use plastic or wooden utensils and plastic or glass containers.

2. Do not refrigerate the starter batter at any time during the ten days. Leave it at room temperature so that it can mature.

3. It is natural for the batter to bubble and rise as it matures.  Work the air away from the batter towards the lip of the Ziploc bag and unzip it to remove the build-up of air in the bag.

4. When the Ziploc bag is opened to release the air, the batter should smell sweet and yeasty. If it is at all malodorous or if the batter is at all discolored at any time during the ten days, throw the bag and its contents in the garbage.  Start the process over and don’t try to salvage the spoiled batter.

Ingredients:

1 (¼ oz.) pkg. Fleishmann’s active dry yeast
¼ cup warm water (110°F)
1 cup all-purpose flour
1 cup white sugar
1 cup warm milk (110°F)

Directions:

1.    In a small bowl, dissolve yeast in warm water for 10 minutes and stir.
2.    Sift flour and sugar into a 2-quart glass or plastic container.
3.    Slowly stir in the warm milk and dissolved yeast mixture.
4.    Loosely cover the mixture with a lid or plastic wrap until bubbly.

Consider this Day 1 of the 10-day cycle. For the next 10 days, handle starter batter following the 10 Day Regimen.